If you want to enable TPM 2.0 in MSI motherboard, here is how you can do that. It is possible to turn on TPM 2.0 in BIOS of MSI motherboard without any problem as long as your hardware supports it.
![]()
TPM or Trusted Platform Module is required for installing Windows 11. If you do not enable TPM on your computer, you won’t be able to install the latest version of Windows OS on your PC. TPM is a hardware-level security module that helps you prevent different unnecessary attacks on your computer. Without enabling TPM, you will get This PC can’t run Windows 11 error all the time.
If you have the supported processor for installing Windows 11, you can easily enable TPM in MSI motherboard.
Windows 11 compatible Intel processors:
https://docs.microsoft.com/en-us/windows-hardware/design/minimum/supported/windows-11-supported-intel-processors
Windows 11 compatible AMD processors:
https://docs.microsoft.com/en-us/windows-hardware/design/minimum/supported/windows-11-supported-amd-processors
Windows 11 compatible Qualcomm processors:
https://docs.microsoft.com/en-us/windows-hardware/design/minimum/supported/windows-11-supported-qualcomm-processors
If you have a Windows 11 supported processor, you can easily turn on TPM 2.0 in the BIOS of MSI motherboard with the help of this guide.
How to enable TPM 2.0 in BIOS MSI Motherboard
To enable TPM 2.0 in BIOS MSI motherboard, follow these steps:
- Restart your computer.
- Keep pressing the Delete button to open the BIOS settings page.
- Switch to the Security tab using right or left arrow keys.
- Select the Trusted Computing option.
- Press the Enter button.
- Select the Security Device Support and press the Enter button.
- Select the Enable option to enable TPM in MSI motherboard.
- Switch to the Save & Exit tab and save the changes.
To learn more about these steps, continue reading.
At first, you need to open the BIOS settings page of your MSI motherboard. For that, restart your computer and keep pressing the Delete key while restarting.
It should open the BIOS setting page. However, you must ensure the designated key to open the BIOS for your motherboard.
After opening the BIOS, switch to the Security tab using the left and right arrow keys on your keyboard. Alternatively, you can use your mouse to get the same thing done.
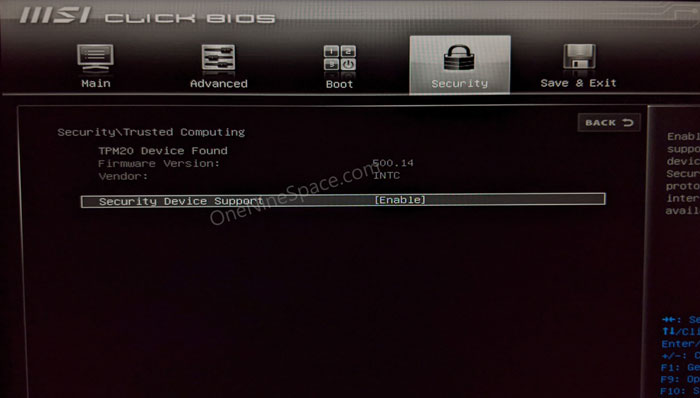
Here you can find an option called Trusted Computing.

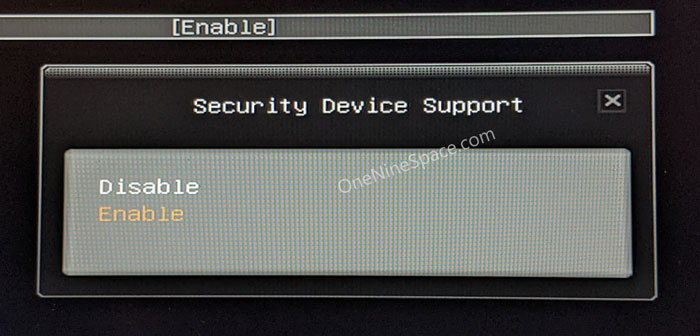
Here you can find a setting called Security Device Support . If it is showing as Disabled, TPM is turned off on your computer. In that case, select this setting and press the Enter button.
Next, select the Enable option to enable or turn on TPM 2.0 in MSI motherboard.
Once done, you need to switch to the Save & Exit tab and save the change and restart your computer.
How to check if you have TPM 2.0
To check if you have TPM 2.0 enabled or not, you click on the Taskbar search icon and search for tpm. It will open a search result called Security Processor. You need to click on this individual search result. Here you need to check the Specification version.
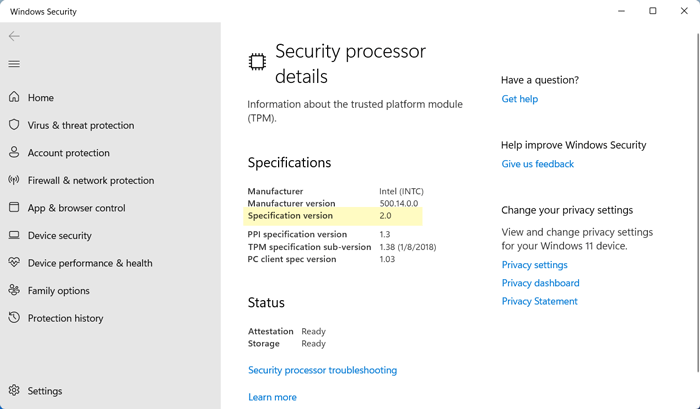
If it is showing as 2.0, that means TPM 2.0 is enabled on your computer.
How do I enable TPM in MSI BIOS?
To enable TPM on MSI BIOS, follow these steps:
- Restart your computer.
- Press the Delete key a few times to open the BIOS settings page.
- Go to the Security tab using right or left arrow keys.
- Select the Trusted Computing option.
- Select the Security Device Support and press the Enter button.
- Select the Enable option to enable TPM in MSI motherboard.
- Switch to the Save & Exit tab and save the changes.
That’s all! Hope this guide helped you enable TPM in MSI BIOS.
Read: How to enable TPM 2.0 in Gigabyte motherboard