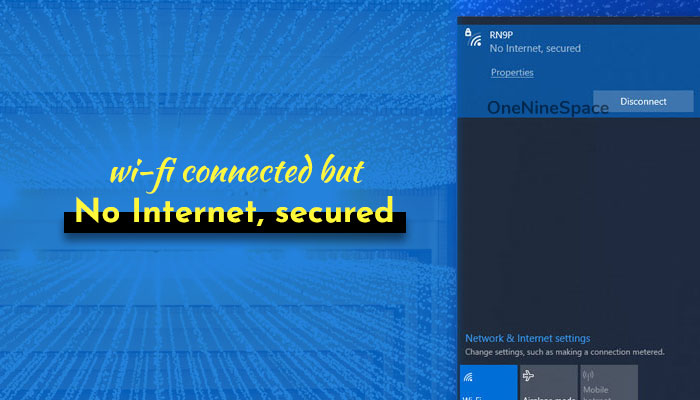
Wi-Fi Connected but no internet access and Wi-Fi Connected, Secured – we have solved both problems in this article. If the internet not working but connected, you can follow these troubleshooting tips and tricks to get rid of this issue. No matter whether you are facing this problem on Windows 11 and Windows 10, the solutions are almost the same across versions.
Nowadays, most of the home or personal computer users use a Wi-Fi network to connect to the internet. If you do the same but it is not doing the job well, there are some fixes you can try out on your device.
For your information, there is not one-stop solution that you need to perform. In other words, if Wi-Fi is connected but no internet on Windows 11/10 or in laptop, you will have go through all these fixes one after one manually.
Wi-Fi Connected but No Internet access in Windows 11/10
To fix Wi-Fi connected but no internet access error in Windows 11/10, follow these steps-
- Connect other device to router
- Flush DNS cache
- Check ping status
- Change Preferred DNS server
- Disable Proxy
- Disable VPN
- IP address conflict
- Mac address conflict
- Scan PC with adware removal tool
- Scan PC with antivirus
- Use winsock reset
- Use Network Reset
- Run troubleshooter
- Reinstall or reset network driver
- Problem with network adapter
- Reset router
- Use System Restore point
- Contact the ISP
To know more about these steps, you should keep reading.
1. Connect other device to router
No matter whether you are using a mobile hotspot or a dedicated Wi-Fi router to provide internet connection to your computer, you should connect other devices. This way you will be ensured whether the problem starts with the router or your device. If you can connect your second device to your Wi-Fi router and internet works on it, you might have to follow only the device related solutions mentioned in this article. Likewise, it is recommended to follow router related solutions if you cannot access internet on the second device.
2. Flush DNS Cache
Flushing the DNS cache can fix WiFi connected but no internet access problem on Windows 11/10 PC. No matter if you are using the Windows 7 or Windows 8.1, you can fix the same with this tutorial. It is very straightforward to flush DNS cache on Windows 11/10 as it is required to run a few commands to get the job done. To fix Wi-Fi connected but no internet error, follow these steps-
- Search for cmd in the Taskbar search box.
- Click on “Run as administrator” option.
- Click the Yes button in the UAC prompt.
- Type these commands and press Enter – ipconfig /flushdns, ipconfig /registerdns, ipconfig /release, ipconfig /renew, netsh winsock reset.
- Restart your computer.
To get started, you will have to open elevated Command Prompt window. After that, enter the aforementioned commands one after one and press the Enter key on your keyboard.
At last, restart your computer.
3. Check ping status
Many people check the Wi-Fi icon in the system tray to decide whether they are connected to the internet or not. At times, it might shows false negative. Apart from that, some apps may not use internet on your computer due to some firewall settings or third-party application. At such a moment, it is recommended to check the ping status of your internet connection. To check the ping status, follow these steps-
At first, press Win+R to open the Run prompt.
Type ping 8.8.8.8 -t and hit the Enter button.
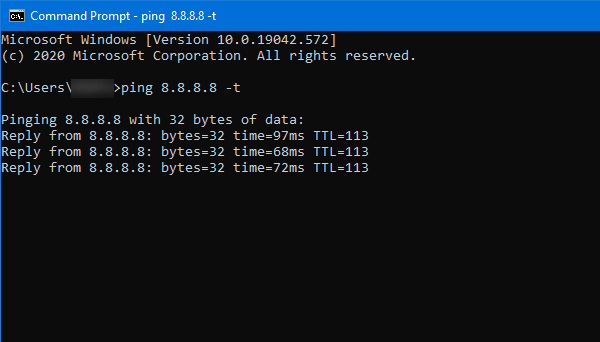
If the Command Prompt window shows continuous result with the ping time and packet numbers, the internet connection is fine and you will have to check for possible firewall blocking.
4. Change Preferred DNS server
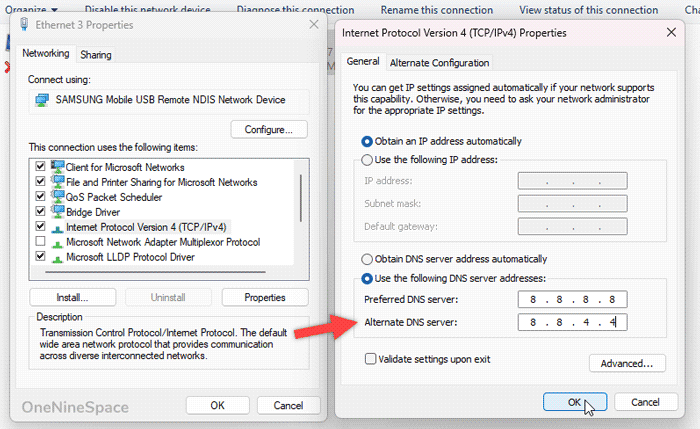
When connect to a Wi-Fi network, it uses a Preferred DNS server and an Alternate DNS server. These things are manifested by the internet service provider or ISP. If the default DNS servers have some issues, you might get WiFi connected but no internet issues on Windows 11/10 laptop computer. Therefore, it is suggested to change the default DNS servers and check if it works or not.
To do so, follow these steps-
- Press Win+R.
- Type ncpa.cpl and hit the Enter button.
- Right-click on connected Wi-Fi network.
- Select “Properties” option in context menu.
- Double-click on Internet Protocol Version 4 (TCP/IPv4).
- Select Use the following DNS server addresses.
- Enter 8.8.8.8 in the Preferred DNS server.
- Enter 8.8.4.4 in the Alternate DNS server.
- Click the OK button to save changes.
After that, check if you can access internet or not.
5. Disable Proxy on Windows 11/10
Sometimes, proxy can cause the connected to Wi-Fi but not internet issue on Windows 11/10. Let’s assume that the connected proxy server has some problem going on at this point. If so, there is no way you will be able to access internet on your computer. No matter what you do, your PC won’t allow you to access internet and you will be like – Why does my Wi-Fi say connected no internet?
Therefore, it is suggested to disable the proxy settings and go with the default settings. For that, press Win+I to open Windows Settings > Network & Internet > Proxy.
On the right-hand side, tiggle the Automatically detect settings button and Use a proxy server button under Manual proxy setup.
6. Disable VPN
Like proxy, Virtual Private Network or VPN can be the culprit as well. It doesn’t matter if you are using VPN in your computer or through the Wi-Fi router, the problem remains the same. Although different routers have different paths for managing the VPN settings, you will get one for your router on the official website of the manufacturer. On the other hand, if you are using VPN in your computer, open the Windows Settings by pressing Win+I > Network & Internet > VPN. Now, make sure that you have no existing VPN setup in here.
If you are using an app, open it on your computer and disconnect from the connected server. After that, check if you can access internet on your computer or not.
7. IP address conflict
If you are getting “Windows has detected an IP address conflict,” error message, you won’t be able to use internet on your computer. Wi-Fi will be connected but no internet will be there on your PC. What this error means is that the same IP address is being used by more than one computer in the same network. The simplest solution to this problem is contacting the internet service provider.
8. MAC address conflict
Let’s assume that you set up MAC filtering in your router earlier. If you forgot to enter the exact MAC address as your computer has, it will not be able to provider internet service to your computer. No matter what you do, you will have to remove the existing MAC filtering functionality or enter the correct MAC address. To find out the MAC address of your computer, follow these steps-
At first, press Win+R to open the Run prompt.
Type cmd and press the Enter button.
Type ipconfig /all and press the Enter button.
Find out the Physical address from the list.
9. Scan PC with adware removal tool
Nowadays people are getting attacked by adware that damages files and settings at the same time. Let’s assume that your PC got attacked by an adware a few days back and now you are not able to use the internet. At such a moment, it is recommended to download an adware removal tool and scan your PC with it. The best free adware removal tool is AdwCleaner.
10. Scan PC with antivirus
Like adware, virus can also attack your system and damage system files. There are thousands of viruses that cause different problems on different systems. If you become a victim of a computer virus, scanning the system files is probably the first thing that is required to do.
You can download any free or paid antivirus software on your computer. Some of the best utilities are Kaspersky, Bitdefender, MalwareBytes, etc.
11. Use winsock reset
Winsock reset helps you remove all the custom made settings of web browsers, VPN clients, email software, etc. In other words, it deletes wsock32.dll file and reverts it to the factory original. If there is an issue with this DLL file, you might get WiFi connected but no internet access problem on your computer. To get started, follow these steps-
- Open Command Prompt with administrator permission.
- Enter this command-
netsh winsock reset
Now, restart your computer and check if you can access internet or not.
12. Reset network
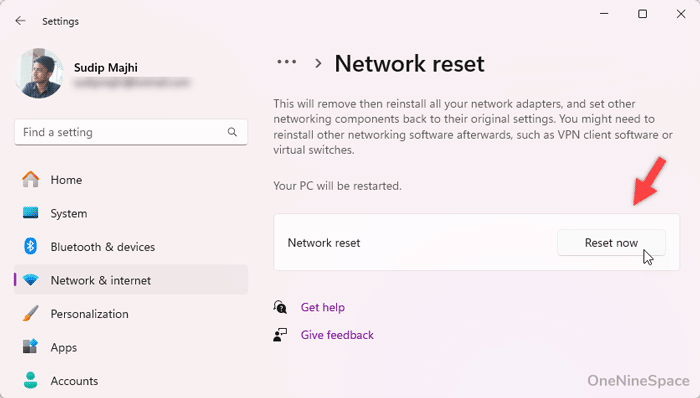
Resetting the network can fix common Wi-Fi connection issue on Windows 11/10. No matter whether you are using a mobile hotspot or a Wi-Fi router, if it is not working correctly, you can reset network to fix the problem. As it is very straightforward to reset network on Windows 11/10, it will take not more than a minute to get the job done. Follow the following steps to reset network on Windows 11/10-
- Press Win+I to open Windows Settings panel.
- Go to Network & Internet.
- Click on the Network reset opton.
- Click the Reset now button.
- Click on Yes button to confirm.
After that, it will take a few moments. After finishing, restart your computer, connect to the Wi-Fi network, and start using internet.
13. Run troubleshooter
Troubleshooters can help you fix common hardware issues on Windows PC. Let is be the internet connection problem or audio issue, you can fix all the common problems with the help of troubleshooter. As Windows 11/10 has some in-built troubleshooter, you can make use of them whenever possible.
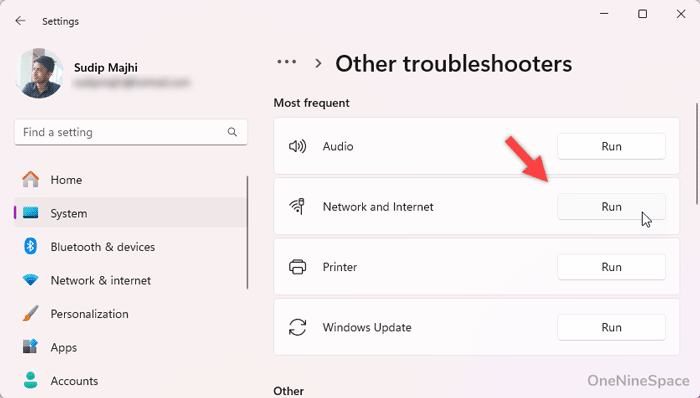
At first, open the Windows Settings on your computer and go to System > Troubleshoot > Other troubleshooters.
If you have already shared the Full Diagnostic Data, you will find all the troubleshooters in the Troubleshoot page.
Select the Network and Internet troubleshooter, and click on Run the troubleshooter button. Now, follow the screen options to find and solve the possible issue.
Similarly, run the Network Adapter troubleshooter. Once done, restart your computer and check if it works or not.
14. Reset or reinstall network driver
Sometimes the network driver can cause such an issue on your computer. If your motherboard has an in-built Wi-Fi functionality, you might not be able to remove and insert it. However, if you are using a dedicated Wi-Fi adapter, it is recommended to follow these steps.
At first, search for “device manager” in the Taskbar search box, and click on the corresponding result. Alternatively, you can press Win+X, and select Device Manager from the list.
After that, expand the Network adapters list, right-click on the network adapter, and select the Uninstall device option.
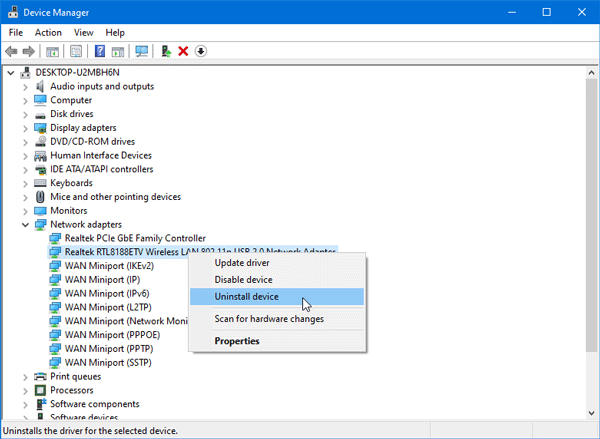
Now, remove the Wi-Fi adapter from your computer, and re-insert it to install the network driver.
15. Change network adapter
If you are using a third-party network adapter or your motherboard has an in-built Wi-Fi adapter, it can cause the issue as well. If the network adapter has an internal problem, you won’t be able to use the internet on your computer. Therefore, if you are using a third-party Wi-Fi adapter, insert it in another computer and check if it is working correctly or not. If not, change it immediately.
16. Reset the router
Sometimes, router can create such an issue on laptop or desktop computer. To fix it, you will have to reset the router. Most of the routers have a dedicated switch to reset it. You will have to insert a pin or something like that in a certain hole and hold it there for a couple of moments until lights start blinking. Following that, enter the IP addresses and start using the router again.
17. Use System Restore point
If you have previously created a System Restore point earlier, it is the time to use it for your benefit. Sometimes this Wi-Fi connection issue appears due to an internet file conflict. If so, it is better to use the System Restore point to get back to an earlier time when everything was fine. The only drawback of this trick is that you cannot use it unless you created a System Restore point in the past.
18. Contact the ISP
It is probably the last thing you want to do. However, it is required when nothing, on this list, is working for you.
Read: How to Restart File Explorer in Windows 11
Why is my internet saying Connected without internet?
There could be so many reasons why your internet or Wi-Fi is saying Connected without internet. If the router is working but the internet source is down, there is a high chance of getting this message on Windows 11/10 computers. To resolve the issue, you should restart your computer and check the ping status first. Then, you can disable proxy and VPN apps, run the respective troubleshooter, etc.
Why is Wi-Fi connected but no internet only on one device?
Many Wi-Fi routers have an option that prevents multiple devices from being connected simultaneously. In fact, almost all the routers have an option to manage the number of devices you want to connect at the same time. If you have enabled such a setting, there is a chance of getting this problem. You should open the admin panel of your router and check whether this setting is disabled or not.
Final word
These are some of the working solutions to fix Wi-Fi connected but no internet issue on Windows 11/10 laptop computer. Generall, it gets resolved by tweaking the network adapter and resetting the router. However, it is better to go through all the solutions as mentioned here.
Read: 3 ways to enable Dark Mode in Windows 11