If you are a new Windows 11 user and you do not know how to get to Windows Settings, you should check out this article. Here is how to open Settings in Windows 11/10. Also, you can find some important options and features that are available in Windows 11/10 Settings panel only.
What is Windows Settings in Windows 11/10?
Windows 11/10 comes with a traditional control panel substitute called Settings, which pops up if you press Win+I button. This Settings panel is probably the best inclusion in this operating system that you can find in all the latest builds. Although this is not the exact substitute of the Control Panel, it has almost all the essential options you might need. If you have recently installed Windows 11/10, and you want to know anything about new options in Windows 11/10 Settings, you can follow this post.
How to open Windows 11/10 Settings panel?
There is a couple of methods to open Windows 11/10 Settings panel so that you can make various changes. Some of the methods are mentioned below.
1. Use keyboard shortcut
You can use the keyboard shortcut, which is probably the fastest method to open the Settings panel in Windows 11/10. The shortcut to open Windows 11/10 Settings panel is Win+I.
2. Open from start menu
You can open Settings in Windows 11/10 from the Start menu. If you are using Windows 11/10, you might know that Microsoft brought back the start menu in this version. This start menu has an option to open the Settings panel in Windows 11/10. There is a dedicated button that you can use to get it done. For that, open the start menu > click the settings gear icon visible on your left-hand side.
3. Use Taskbar search box
You can use the Taskbar search box to open the Settings in Windows 11/10. You need to make a search for ‘Settings’ and open the respective result.
4. Use Win+X menu
Microsoft has introduced a new keyboard shortcut that allows you to open a couple of options and settings. The Windows 11/10 Settings is available in that preset list. Therefore, you can press Win+X and select Settings from the list.
5. Create desktop shortcut
You can create desktop shortcut to open Windows 11/10 Settings. This is possible to pin the shortcut to your Taskbar as well.
- Right-click on Desktop.
- Select New >> Shortcut.
- Enter this-
ms-settings:
- Write a desired name.
- Double-click on this shortcut to open the Settings panel.
6. Open Windows 11 Settings using run prompt
You can use the Run prompt to open Settings in Windows 11. For that, press Win + R to open the Run prompt and enter this-
ms-settings:
7. Open Windows Settings from Action Center (Windows 10)
You can open Settings from the Action Center as well. If you expand the Action Center from your taskbar, you can find an option called All Settings that you can use to open the Settings panel.
These are some of the best methods to open Settings in Windows 10. However, there are some other ways to get the same thing done. For instance, you can use Windows PowerShell, Task Manager etc. to open the same as well.
Please Note: All these following options are available in Windows 10 v1909.
Windows Settings options
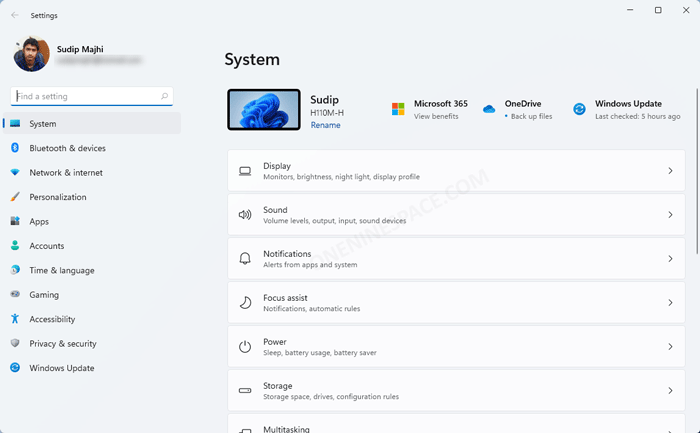
The user interface of Windows 11 Settings panel is neat and clean. You cannot find any clutter since all the options are well organized. Having said that, Windows 11 Settings panel has thirteen different categories and they are-
- System
- Devices
- Phone
- Network & Internet
- Personalization
- Apps
- Accounts
- Time & Language
- Gaming
- Ease of Access
- Search
- Cortana
- Privacy
- Update & Security
Each of the categories comes with some sub-options to manage every aspect of your computer. From changing the wallpaper to troubleshoot common Windows problems using in-built troubleshooters, you can find everything in this Settings panel. Therefore, just read on to check all the options Windows 10 Settings panel has.
1. System
The System settings category generally allows you to manage some features or functionalities related to hardware and all. More specifically, you can find these in this section-
Display: If you want to manage your dual monitor setup, choose primary monitor, change resolution, text/app size, enable or disable Night Light, change dual monitors’ behaviours, etc. you can find all the options here.
Sound: If you want to change audio output device, volume, troubleshoot common audio related problems, set app-based volume, etc. this is the section you need to open.
Notifications & actions: You can add or remove icons or options from Action Center, enable/disable notifications on lock screen, show reminders and incoming VoIP calls on the lock screen, show Windows welcome experience after updates and occasionally when you sign in to highlight what’s new and suggested, get tips, tricks, and suggestions as you use Windows, get notifications from apps and other senders, etc. Apart from that, you can choose which app can show notification in the Action Center. It lets you unclutter the Action Center and increase your productivity.
Focus assist: Formerly Quiet Hour, Focus assist will let you set various rules so that you do not get distracted by any app. You can choose the notification type, set different rules and many more.
Power & sleep: You can choose when your computer will turn off or go to sleep.
Storage: You can check your free and used storage space here. Apart from that, you can enable or disable Storage Sense, which helps you automatically clear folders like Recycle Bin, Temporary folder, etc.
Tablet mode: If you want to turn your computer’s screen into a tablet, you can use the Tablet mode. Other than enabling this feature, you can hide the taskbar in tablet mode.
Multitasking: In Multitasking section, you can enable or disable different features that are responsible for your multitasking functionalities. For example, you can enable or disable these settings-
- Arrange window automatically by dragging them to the sides or corners of the screen
- When I snap window, automatically size it to fill available space
- When I snap a window, show what I can snap next to it
- When I resize a snapped window, simultaneously resize any adjacent snapped window
- Show suggestions occasionally in your timeline
Projecting to this PC: If your Windows 10 computer has Miracast support, you can project your Android or Windows device to this PC wirelessly. This section has all the options to manage the projection.
Shared experiences: If you want to allow apps on other devices open and message apps on your current device or the opposite of it, you can use the Shared experiences section.
Clipboard: Windows 10 comes with Cloud Clipboard that helps you synchronize your clipboard items across multiple devices. You can enable, disable or tweak the corresponding settings from here.
Remote Desktop: To manage your Windows device from Android, iOS, or macOS, you can use the Remote Desktop option.
2. Devices
The Devices category of Windows 10 Settings offers all the options to manage various external devices you have or can use with your computer.
Bluetooth & other devices: From this panel, you can handle all the devices that are connected via Bluetooth. From mouse or keyboard, to other phone, you can find everything here.
Printers & scanners: If you have a printer connected with your computer, you can tweak different settings of that printer from here.
Mouse: It helps you open mouse settings on Windows 10. To change the primary button’s function of your mouse, or how many lines your want to scroll each time, you need to open this section.
Typing: The Typing panel comes some options to toggle these features-
- Autocorrect misspelt words
- Highlight misspelt words
- Show text suggestions as I type on the software keyboard
- Add a space after I choose a text suggestion
- Add a period after I double-tap the Spacebar
- Show text suggestions as I type
- Show text suggestions based on the recognized languages you’re typing in
Pen & Windows Ink: If you want to change the font when using handwriting feature or if you want to get some app suggestions, you can use this feature.
AutoPlay: If you frequently insert a CD or DVD or SD card, and you want to perform a certain task, you can use the AutoPlay section.
USB: It has only one setting and that lets you notify if there are issues connecting to USB devices.
3. Phone
Let’s assume that you are browsing a website on your mobile but the website is not responding correctly on the mobile device. At such a moment, you might want to open the same page on your computer. If so, you can use this functionality that allows you to continue your work on your PC from your mobile. In a nutshell, you can get SMS, email, phone call, etc. on your computer if your phone is connected via this functionality.
4. Network & Internet
As the name suggests you can manage your network-related options from here. More specifically, you will get the following options in this panel.
Status: If you want to check whether you have a valid internet connection or not, this is the best path you can navigate to. From here, you can manage your adapter settings, sharing option, as well as, reset network to fix Wi-Fi connected but not internet issue, troubleshoot common networking related problems.
Ethernet: If you are using an Ethernet connection, you can make your network private or public from here. Other than that, you can set up a metered connection.
VPN: If you want to use a system-wide VPN, you can use this panel. From here you can set up the VPN, all it to use over metered networks and while roaming.
Data usage: You can check how much data you have used in the past couple of days. You can choose a network name and check the usage accordingly. This is also possible to set a data limit if you have limited bandwidth.
Proxy: If you want to use a proxy, you need to open this setting. From here, you can choose manual proxy settings and change the settings according to your requirements. In simple words, it lets you open proxy settings in Windows 10. For your information, some HTTP status codes such as 305, 407 etc. can also be fixed from here.
5. Personalization
From the initial days, Microsoft has been including a dedicated panel so that users can manage wallpaper, theme, etc. Even in Windows 10, you can similar options in the Settings panel.
Background: You can find wallpaper settings in Windows 10 and change your wallpaper from here.
Colors: This is possible to choose a colour for your computer. More specifically, you can turn on-off transparency effect, title bar colour, windows border colour, taskbar colour, start menu colour, etc. The best thing is you can enable or disable Dark mode from here.
Lock screen: If you want to change the lock screen background, you can find that option here. You can also use a solid colour, and Windows spotlight.
Themes: Although Microsoft ditched the theme functionality in Windows 8/8.1, they have retained it in Windows 10. You can create, enable or disable a theme from this panel.
Start: If you want to customize your Start menu, you should follow these options-
- Show more tiles on Start
- Show app list n Start menu
- Show recently added apps
- Show most used apps
- Show suggestions occasionally in Start
- Use Start fullscreen
- Show recently opened items in Jump Lists on Start or the taskbar
Taskbar: The Taskbar is an important element of your Windows computer and if you want to tweak various settings of options of Taskbar, you can open this section. This panel offers the following options-
- Lock the Taskbar
- Automatically hide the taskbar in desktop mode
- Automatically hide the taskbar in tablet mode
- Use small taskbar buttons
- Replace Command Prompt with Windows PowerShell in the menu when I right-click the start button or press Windows key + X
- Show badges on taskbar buttons
- Set taskbar location
- Combine taskbar buttons
6. Apps
From the Apps menu, you will be able to manage your apps. From changing the location to terminate it whenever needed, you can do everything with the help of the Apps menu.
Apps & features: You can prevent third-party apps from being installed on your computer, uninstall installed apps, reset in-built apps, and many more.
Default apps: As per the name, you can set default apps for various things like email, maps, music, video, etc. This is also possible to choose default apps by file type. For example, if you do not like Microsoft Edge, and you want to set Google Chrome as the default browser, you can do that from here.
Offline maps: If you use the Maps app, you can download maps offline and use that even when you do not have an internet connection.
Apps for websites: You can open various apps if a website is associated with the app. For example, it opens Microsoft Edge, when your system faces share.microsoft.com.
Video playback: You can manage Windows HD colour settings, play video at a lower resolution and much more.
Startup: This is possible to manage, add, remove startup items in Windows 10.
7. Accounts
All the local and Microsoft account-related options are visible here. That said, you can find these following options.
Your info: You can manage your basic account settings, profile picture etc. from here.
Email & accounts: You can add email account that will be used by the email, calendar, contacts etc.
Sign-in options: You can set up Windows Hello, change account password, set up picture password, enable Dynamic Lock, etc.
Family & other users: If you use Microsoft Family feature or service, you can manage your accounts from here. Apart from that, you can add your family member to your computer as well.
Sync your settings: If you have multiple Windows 10 computers and you want to use the same settings, themes, languages preference, etc. you can synchronize those across multiple devices from this panel.
8. Time & Language
If you want to change the time zone, time, date, etc. you need to open Time & Language settings. Apart from those, you can change the default voice for apps.
9. Gaming
This is very easy to record gameplay on Windows 10 after the inclusion of Game Bar. You can record, broadcast any game with the help of this Gaming functionalities. There is another option called Game Mode. If you activate Game Mode, your computer will use maximum resources to spruce up the gaming experience.
10. Ease of Access
As the name defines, this section is popular among them, who want to make icons, text, etc. bigger or smaller, use high contrast theme, magnifier, enable narrator, enable Speech Recognition, and many more.
11. Search
The Search category has three different sub-categories and they are Permissions & History, Searching Windows, and More details. In the first tab, you can find some options to manage the web search result, cloud content search result, history and so on. This is possible to deal with the type of result you want to get while searching for a keyword in the taskbar search box. The second section will let you include or exclude any folder, file, app, etc. from the Windows search result.
12. Cortana
Although Cortana is near to death, there are many people who love to use a digital assistant on their mobile or computer. If you are one of them, who would like to give Cortana a try, you can check out these settings. From this section, you will be able to enable Hey Cortana voice command, keyboard shortcut, enable Cortana on lock screen, choose Cortana language, etc. Other than that, you can get phone notifications on your current computer as well.
13. Privacy
Microsoft gathers a lot of information from Windows 10 users. If you are unaware of that, you might need to open the Privacy section in Windows 10 Settings panel. From here, you can manage everything related to privacy and personal security. You can allow or block a particular app from accessing a particular hardware or another app, and so forth. Also, you can enable online speech recognition, view diagnostic data, and more.
14. Update & Security
This section not only has all the options to manage your updates, but also you can find some troubleshooters to fix common problems.
Windows Update: You can download, install, manage your updates from this location.
Delivery Optimization: You can allow your current computer to download updates from PCs on your local network.
Windows Security: Windows Defender is now much more useful than before and you can tweak various settings of Windows Defender from this panel.
Backup: You can backup your files to another drive. It becomes handy when you lose your data from a drive since this backup can pull up data when the original file is damaged.
Troubleshoot: Microsoft has included some troubleshooters to fix different problems related to Bluetooth, Windows Update, Audio, Printer, Internet Connection, Power etc. If you are facing any problem, you can head over to the Troubleshoot menu and run a troubleshooter in Windows 10 accordingly.
Recovery: In case you need to Reset your PC or boot PC into Advanced Startup options, you can use the Recovery menu.
Activation: This is probably the first thing you need to open after installing a fresh copy of Windows 10 since it lets you activate your Windows 10 PC.
Find my device: If you enable this feature, you can track the location of your device from Microsoft website. However, you need to sign in with your Microsoft account first.
For developers: If you want to sideload apps from third-party resources, or do other tasks related to device discovery, portal, etc. you can manage them from here.
Windows Insider Program: If you are using the stable release of Windows 10 and you want to sign up for Windows Insider Program to test the Insider Preview builds, you can hit the corresponding Get started button.
These are all the settings you can find in Windows 10 Settings panel. You should follow the first method to open Settings in Windows 10 and navigate to the path that you want to open.
How to hide specific settings page of Windows Settings?
Windows 10 offers a lot of pages or options in the Windows Settings panel. Many people might not need all those settings – especially when they are handing over the computer to their little kid, who is not aware of such functionalities. If you are one of them, who wants to hide specific settings page of Windows Settings, you should follow this tutorial. There are two ways to hide specific settings page of Windows 10 Settings Panel. You can use either Local Group Policy Editor or Registry Editor. If you are using Windows 10 Home edition, you have to use the Registry Editor method since Group Policy Editor is not available in your computer. Apart from that version, all the other users can use any of these two tricks.
Hide specific page of Windows Settings using Group Policy Editor
To hide specific page of Windows Settings using Group Policy Editor, follow these steps:
- Open Group Policy Editor. Press Win+R, type gpedit.msc and hit the Enter button.
- Navigate to this path:
Computer Configuration > Administrative Templates > Control Panel
- Double-click on Settings Page Visibility that you can find on your right-hand side.
- Select Enable and write down the URI of all the page that you want to hide. It should look like this-
hide:about; - Click Apply and OK to save your change.
If you want to hide multiple pages, you need to keep listing everything like this-
hide:about;backup;activation;
Hide specific page of Windows Settings using Registry Editor
To hide specific page of Windows Settings using Registry Editor, do follow these trick:
- Open Registry Editor by searching regedit in the Taskbar search box or Start Menu.
- Go to –
HKEY_LOCAL_MACHINE\SOFTWARE\Microsoft\Windows\CurrentVersion\Policies\Explorer
- Create a new String Value on your right-hand side and name it SettingsPageVisibility.
- Double-click and enter something like this in the Value data box –
hide:about; - Click OK to save your change.
Like Group Policy Editor, if you want to hide multiple pages, you need to add all the values one after one.
Microsoft Technet website has listed down all the page URI for users’ benefit. Here is the list you might need-
- about
- activation
- appsfeatures
- appsforwebsites
- backup
- batterysaver
- bluetooth
- colors
- cortana
- datausage
- dateandtime
- defaultapps
- developers
- deviceencryption
- display
- emailandaccounts
- extras
- findmydevice
- lockscreen
- maps
- network-ethernet
- network-mobilehotspot
- network-proxy
- network-vpn
- network-directaccess
- network-wifi
- notifications
- optionalfeatures
- powersleep
- printers
- privacy
- personalization
- recovery
- regionlanguage
- storagesense
- tabletmode
- taskbar
- themes
- troubleshoot
- typing
- usb
- windowsdefender
- windowsinsider
- windowsupdate
- yourinfo
How to show only specific pages of Windows 11/10 Settings?
If you want to show only specific pages of Windows Settings on Windows 11/10, there are two methods. First, you can apply the aforementioned tricks to hide all unnecessary pages. However, that process is quite longer and you need to list down all the pages one by one. Here is a simpler guide that that, which lets you hide all the pages at once except desired one.
You need to open Registry Editor or Group Policy Editor and go to the same location as you did earlier. Here you need to enter something like this-
showonly:about;recovery;printers;
In other words, Technet introduced two keywords i.e. hide and showonly. If you use hide keyword, it will hide all the specific pages. The showonly keyword does the exact opposite thing.
Windows Settings vs Control Panel
Control Panel was introduced a long time back, which contained all the options. From account settings to personalization – everything was possible through the Control Panel. However, the days are gone now. Windows Settings does all those jobs for you. The old Control Panel is still available in the latest stable release of Windows 11/10. However, that is next to useless since almost all the important and daily-life options including Windows Troubleshooters, which are important to fix common Device Manager error codes, are migrated from Control Panel to Windows Settings. Some options like Uninstall a program, Change account type are still available in the Control Panel.
Most of the users are already using the new panel to manage every aspect. If you have recently installed Windows 11, you should not opt for the Control Panel because Microsoft is about to kill that traditional tool. Also, you should not have any problem with the Settings panel as it is more user-friendly than the old one. It is very easy to find some options, settings, etc. The user interface is quite better as well.