If you want to turn off or disable Windows Security in Windows 11, here is how you can do that. It is possible to disable Windows Defender or Microsoft Defender in Windows 11 with the help of this step-by-step guide. You can get it done using Windows Security settings, Local Group Policy Editor, Registry Editor, and Windows PowerShell.
Windows Security (Formerly, Microsoft Defender) is the in-built security shield or antivirus available in Windows 11, Windows 10, and older versions. However, if you think that Windows Security is making your system slower or want to install another third-party antivirus tool, you can disable the native antivirus using this guide.
It is possible to enable or disable Microsoft Defender in Windows 11 permanently and temporarily. Depending upon the situation, you could try different methods as mentioned below.
How to disable Windows Security in Windows 11 using Settings
To disable Windows Security in Windows 11 using Settings, follow these steps:
- Press Win+S to open the Taskbar search box.
- Type windows security and click on the search result.
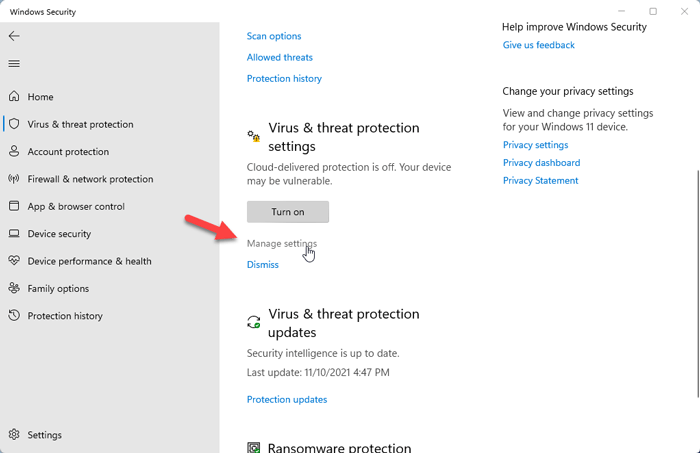
- Switch to the Virus & threat protection tab on the left side.
- Click the Manage settings option under the Virus & threat protection settings.
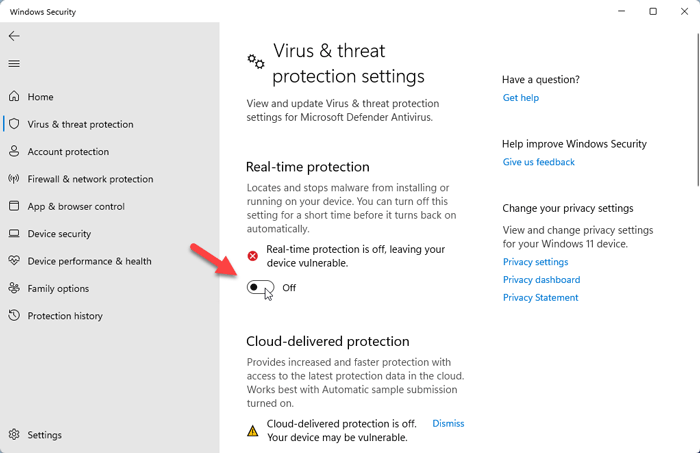
- Toggle the Real-time protection, Cloud-delivered protection, Automatic sample submission, and Tamper protection buttons.
- It disables the Microsoft Defender Antivirus.
To get started, you need to open the Windows Security panel on your system. For that, press Win+S to open the Taskbar search box, type windows security, and click on the individual search result.
Then, switch to the Virus & threat protection tab on the left side and click on the Manage settings option under the “Virus & threat protection settings.”
Here you can find four toggle buttons:
- Real-time protection
- Cloud-delivered protection
- Automatic sample submission
- Tamper protection
You need to toggle those buttons to turn Microsoft Defender Antivirus off on your PC.
As mentioned, it disabled the Microsoft Defender Antivirus in Windows 11. However, it is temporary, and Windows Security continuous to run other background services even though you disable Microsoft Defender Antivirus.
How to disable Windows Security in Windows 11 permanently
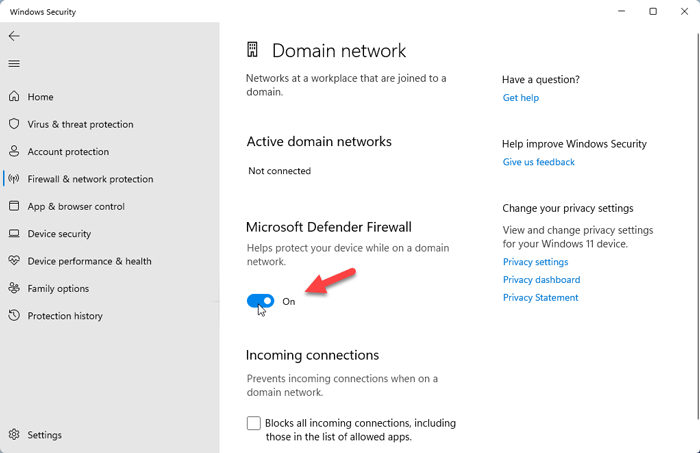
To disable Windows Security in Windows 11 permanently, you need to open each setting one after one and disable all of them. For example, you need to open the Firewall & network protection tab and go to Domain network, Private network, and Public network.
Then, toggle the Microsoft Defender Firewall button to disable Microsoft Defender Firewall in Windows 11.
After that, go to the Device security tab, click on the Core isolation details option, and toggle the Memory integrity button.
How to disable Microsoft Defender in Windows 11 using Group Policy
To disable Microsoft Defender in Windows 11 using Group Policy, follow these steps:
- Press Win+R to open the Run prompt.
- Type gpedit.msc > hit the Enter button.
- Go to Computer Configuration > Administrative Templates > Windows Components > Microsoft Defender Antivirus.
- Double-click on the Turn off Microsoft Defender Antivirus setting.
- Select the Enabled option.
- Click the OK button.
- Go to the Real-time Protection folder.
- Double-click on the Turn off real-time protection setting.
- Select the Enabled option.
- Click the OK button.
At first, you need to open the Local Group Policy Editor. For that, press Win+R to open the Run prompt, type gpedit.msc, and hit the Enter button. Then, navigate to the following path:
Computer Configuration > Administrative Templates > Windows Components > Microsoft Defender Antivirus
Here you can find a setting called Turn off Microsoft Defender Antivirus on the right side. You need to double-click on it and select the Enabled button.
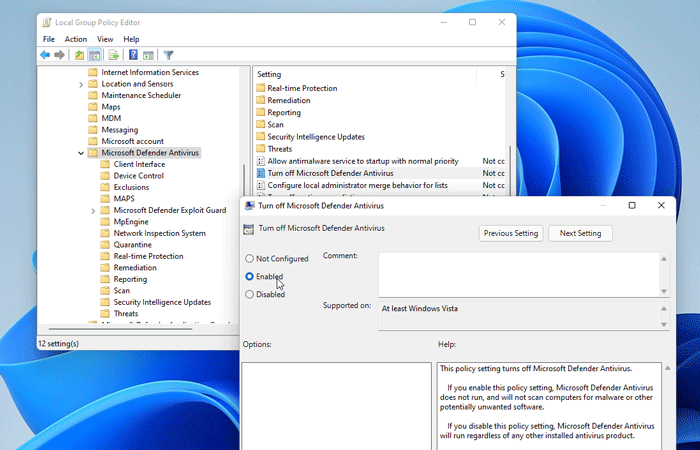
Click on the OK button to save the change.
Next, you need to expand the Microsoft Defender Antivirus folder and select the Real-time Protection folder. Here you can find a setting called Turn off real-time protection.
You need to double-click on it and select the Enabled option.
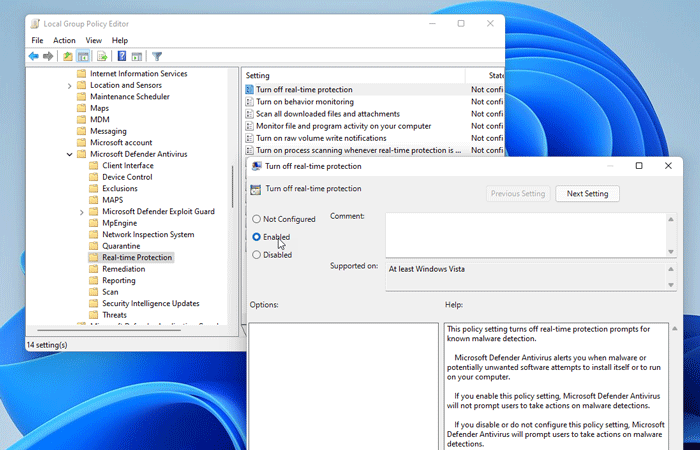
Click the OK button to save the change.
After that, Microsoft Defender Antivirus will be disabled immediately.
How to disable Microsoft Defender in Windows 11 using Registry Editor
To disable Microsoft Defender in Windows 11 using Registry Editor, follow these steps:
- Press Win+R to open the Run dialog.
- Type regedit > hit the Enter button > click the Yes option.
- Go to: HKEY_LOCAL_MACHINE\SOFTWARE\Policies\Microsoft\Windows Defender
- Right-click on Windows Defender > New > DWORD (32-bit) Value.
- Name it as DisableAntiSpyware.
- Double-click on it to set the Value data as 1.
- Click the OK button.
- Right-click on Windows Defender > New > Key.
- Name it as Real-Time Protection.
- Right-click on Real-Time Protection > New > DWORD (32-bit) Value.
- Name it as DisableRealtimeMonitoring.
- Double-click on it to set the Value data as 1.
- Click the OK button.
- Restart File Explorer or computer.
To learn more about these steps, continue reading.
Precaution: Before getting started, it is recommended to backup Registry files.
At first, you need to open the Registry Editor on your computer. For that, press Win+R to open the Run dialog, type regedit, and press the Enter button. If the UAC prompt appears, click the Yes option.
Next, navigate to the following path:
HKEY_LOCAL_MACHINE\SOFTWARE\Policies\Microsoft\Windows Defender
Right-click on the Windows Defender key and select New > DWORD (32-bit) Value.
Following that, name it as DisableAntiSpyware and double-click on it to set the Value data as 1.
Click the OK button to save the change.
Next, you need to right-click on the Windows Defender key and select New > Key.
Name it as Real-Time Protection. Then, right-click on it and select New > DWORD (32-bit) Value.
Name it as DisableRealtimeMontoring and double-click on it to set the Value data as 1.
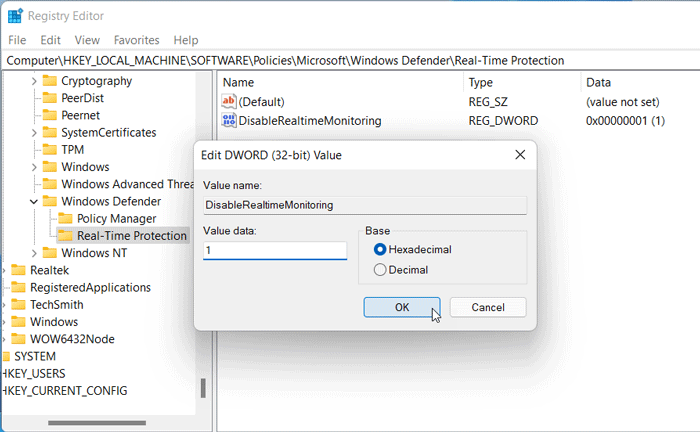
Click the OK button to save the change. At last, you need to restart File Explorer or restart Windows 11 computer.
How to disable Microsoft Defender in Windows 11 using PowerShell
It is possible to disable Microsoft Defender in Windows 11 using PowerShell. In other words, you can uninstall Microsoft Defender Antivirus with the help of Windows PowerShell. To uninstall Microsoft Defender using Windows PowerShell in Windows 11, follow these steps:
- Right-click on the Start menu or press Win+X.
- Select Windows Terminal (Admin) from the menu.
- Click on the Yes option.
- Enter this command: Uninstall-WindowsFeature -Name Windows-Defender
To get started, you need to open Windows PowerShell as administrator. As Windows 11 comes with Windows Terminal, you can open that as well. For this example, we are going to use Windows Terminal as administrator. To open it, press Win+X, select Windows Terminal (Admin), and click the Yes option.
Then, enter this command:
Uninstall-WindowsFeature -Name Windows-Defender
If in the future, you change your mind and want to re-install Windows Defender or Microsoft Defender in Windows 11, you can enter this command:
Install-WindowsFeature -Name Windows-Defender
It will be installed immediately.
Wrap up: Disable Windows Security and Microsoft Defender in Windows 11
Disabling Windows Security or Microsoft Defender Antivirus in Windows 11 is not that difficult as long as you follow the aforementioned guides. However, you must have an administrator account to turn of Microsoft Defender easily.
- How to open Task Manager in Windows 11
- How to Restart File Explorer in Windows 11
- How to Disable or Remove Startup Programs in Windows 11
- How to remove Widgets icon from Taskbar on Windows 11