If you want to make one page landscape in Word or Office 365, this article will be handy for you. Whether you want to make one page portrait in Word or Word Online, you can follow this tutorial to get the job done. For your information, you need to use section break as it is not possible to insert landscape or portrait page without section break.
Microsoft Word is one of the best text processing apps for Windows and Mac. Whether you want to use it for school projects or office reports, you can do both using this Microsoft 365 app, formerly known as Office 365. At times, you might want to rotate page in Word document to make it compatible with other objects inserted into a page.
By default, Word on Windows and Mac creates pages in portrait mode. In other words, it creates a page to comply with the A4 page for printing fluently. However, let’s presume that you want to make a different page in landscape mode in Word for fulfilling the client’s or superior’s needs. At such a moment, you must use the section break to get the job done whether you want to make this change in a new or existing document. Otherwise, all the pages will turn into the same mode at once.
How to make one page landscape in Word
To make one page landscape in Word, follow these steps:
- Open Microsoft Word and create a document.
- Place mouse cursor at the end of the previous page.
- Go to Layout > Breaks > Next Page.
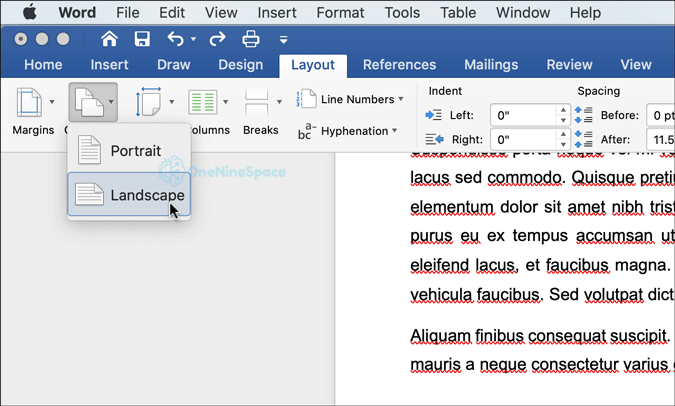
- Click on Orientation > Landscape to make one page landscape.
- Place mouse cursor at the end of selected page.
- Click the Layout > Breaks > Next Page.
- Click on Orientation > Portrait.
At first, open your document in Microsoft Word. If you want to create a new one, choose the Create button. After that, select a page that you want to orient or rotate in Word. For example, you have three pages named Page1, Page2, and Page3 and you want to rotate Page2 only.
Now you have to place your mouse cursor at the end of the previous page of Page1. Then, switch to the Layout tab and select Breaks > Next Page.
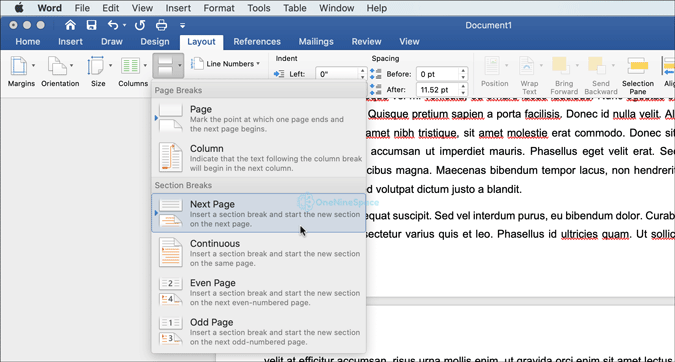
It creates a section break between those two pages. Following that, go to Orientation and choose the Landscape option.
It rotates all the subsequent pages at once. As you want to make only one page landscape in Word, you have to break the selected page from other subsequent pages. For that, place your mouse cursor at the end of the selected page and choose Breaks > Next Page.
Following that, click on the Orientation option and choose Portrait from the list.
You can use the same method to make only one page as portrait in Word. In that case, you have to click on Orientation > Landscape right after opening the document. It will convert all pages in landscape mode. Following that, create a section break before the selected page, change the orientation of the page, create another section break after the selected page, and again use the orientation option.
It is very straightforward to make one page landscape or portrait in Word on Windows and Mac. Whether you are using the Windows or Mac version, you can perform the same steps to get the same result in Word 2016, 2019, Office 265, and Word Online.